
Here in Michigan the polar vortex looms again on our horizon–so, despite the lateness in the season, I’m drawn back by the allure of new hats and scarves from my old crate of other people’s discarded yarn. These two projects floated down my feed yesterday, and my mind was *blown!*
Category: Projects
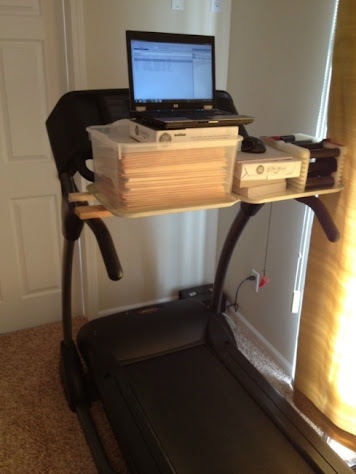
DIY Standing Desks
On the off chance you missed the memo: Your chair is killing you!!1!

The tl;dr goes something like this: Human bodies are really ill-served by sitting in a chair for periods longer than ~30 minutes; it tangles up your digestion, causes problems all up and down the spine, and if you are typing at a keyboard is also pretty hard on your blood circulation. Also, “resting” this much strains the heart, as we’re evolved to use the big muscles in our legs to help circulate our blood, thus relieving stress on the heart. We evolved to move around a lot–mostly walking from place to place–not sitting super still while moving our fingers super fast. If you prefer this sort of thing as a totally excessive infographic, the canonical one is to the right.
Anyway, over at the Workantile–which is populated by folks whose jobs are to sit very still while their fingers move very fast–we talk about the health ramifications of our sedentary jobs *a lot*. One of the easiest solutions–in addition to mandating regular perambulations–is to add a standing desk to your office. Our space includes a couple of high cafe tables, as well as one of these bad boys:
This is one of the best store-bought standing desks I’ve seen, because:
- It has an adjustable monitor mount: Many folks choose standing desks because looking down at their hands all day is screwing up their necks and backs–looking straight ahead is much more comfortable
- It’s convertible: The whole thing can raise and lower so that you can take periodic sitting breaks; shifting from sitting to standing (and being able to sit in multiple different postures) is ideal
- It’s flexible: This fella clamps to a wide variety of existing desks, and is really quick and easy to set up
I’m 99 percent sure this particular model (which a member donated) is an “WorkFit-S Single HD Sit-Stand WorstationErgotron WorkFit-S Sit-Stand Workstation,” which costs several hundred dollars.
For those on a budget, their are *tons* of ways to rig up a workable (if, let’s face it, ugly as hell) standing desk. This is a project that’s totally responsive to Roosevelt’s Law of Task Planning (aka Akins Law #34: Do what you can, where you are, with what you have.) Here’s mine:

(The sheet is just there to aid visibility; otherwise it’s hard to see the damn thing against all the clutter hung in my cave)
Yes, this thing–the Fool’s Swing–is ridiculous. I originally hung it up as a platform to test different standing-desk heights in order to determine what I wanted to build (it’s next to my sit-down desk–in ancient, dented Steelcase monster I bought for a dollar–so I can readily shift between sitting and standing). But I discovered that the swing–which took all of five minutes and no dollars to construct–was a good solution for me. Part of the reason this works is that my neck and spine are in great shape–looking down all day doesn’t bother me (also, I touch type, and frequently look away from the screen and just stare into space in front of my as I write); I use a standing desk because working a sit-down job wrecked up my digestion pretty badly (a hereditary thing, as it turns out). The other advantage here is that the swing pushes away from me. I have a tendency to put too much weight on my wrists and lean into them, and the swing doesn’t let me do that. My wife constantly predicts that this arrangement is going to end in a computer-dumping disaster, but it’s been a year and some change, and I’ve never even had a close call. Seeing as how it is basically the same structure as swings I’ve hung–which have put up with much greater weight and abuse without collapsing–I’m not that worried.
Another member of our workspace has this rig, which I love:
Totally ad hoc, but it allows him to pace while working, which is brilliant. Again, zero-cost, and under 30 minutes to build.
Another option is just to boost your desk as a whole. One thing I envy here is that he has an entire raised workspace; when I’m revising (which I do on paper) at home, I generally have to sit at my desk; on book projects, this can mean full days seated, which gets pretty miserable by mid-morning. Although this method requires a lighter desk to begin with (my Steelcase would crush those milk crates), it’s another no cost/quick build solution:

Finally, here’s a link to the canonical $22 Standing Desk from Stock IKEA parts. No one I know has built one, every standing-desker I know has been inspired by it.
FYI, if you’re going to shift to standing and you have a hard floor (mine is vinyl tile on concrete), invest in an “anti-fatigue” gel mat. I got a “Martha Stewart” branded one for $20 at the hardware. Your feet and lower back will thank you. (These are also great in the work room and, if you cook a lot, in front of the sink.)
The Coworking Society: My Day Not-Job
First off, sorry for the week of radio silence; I was traveling for Spring Break with my wife and kids. I’d assumed I’d have a chance or two to update the Snip, Burn, Solder Blog while on the road, but instead ended up investing my writing pomodori in a new short story (not to spill the beans on it, but there’s Chicago’s elevated train, pickpockets, and naked folk in the story. I think we can all agree these will have been words well spent). All apologies, no excuses.
Secondly, this interview (conducted by the remarkably patient Mark Maynard) is now up: Inside Ann Arbor’s Workantile coworking community. It’s an +8,000 word (!!!) interview with me and the other two “owners” of the “Coworking Society,” and absolutely and profoundly unprofitable LLC whose sole purpose is to support the Workantile, a community of freelance and independent workers who share goodwill and a *lovely* 3000-square-foot workspace in downtown Ann Arbor, MI.
Here’s an interview snippet:
MARK: Is there a culture of collaboration at Workantile? Do you have examples, for instance, of projects involving multiple members, which wouldn’t have otherwise come about? Or are people more inclined to just work on their own projects? Assuming it’s the former, are there things that you’ve done to help facilitate the exchange of ideas between members, etc?
BILL: Again I want to unpack the assumptions here a bit. If you mean: are there work collaborations between members? Not much. We all pretty much have too much work already. There are ideas for new things, and at least a few of them have gone somewhere. But we all understand that whenever we launch a new Next Google, our dance cards are immediately filled with appointments with investors or for a boot stamping on our faces–forever. So that outcome tends to be a self-trimming branch as far as Workantile is concerned.
. . .
DAVE: Just to take a sec and disagree with my distinguished colleague: I’ve seen and participated in a fair amount of “billable work collaboration/hook-up” in the Workantile–but I don’t think this is unusual in any community. I know folks who are deep into their communities of faith; those are their goto communities, and if they’re looking for a lawyer or writer or graphic designer or builder, those are the people they ask. This is the same at Workantile, except for without the God business. When I needed a tech reviewer for the electronic projects in my very enjoyable book of geeky crafting, I ended up hooking up a Workantile member (the one that designed and built our original computer-controlled door system, in fact). When another member needed someone to write content for web sites he develops or do some of the coding for those sites, he asked around Workantile. The writing group I’m in now–and, with whose support, I’ve done my best work–was introduced to me by a Workantile member. Our email group regularly has threads that start with: “Hey; I need a contract looked at; what lawyers do you guys trust? My sewer pipe is collapsing; what plumbers do you trust? I wanna buy ethically raised pork; who knows a pig guy?” I think maybe what Bill wants to foreground is that this sort of commerce isn’t our *purpose*, just a by-product–but what *I* want to foreground is that commerce is the human business, and whenever humans are in a group fungible exchanges are brewing. Dogs sniff butts, we recommend organic CSAs, but it’s all the same.
So, if you’ve been wondering what “coworking” and “coworking spaces” are all about, or the ways folks do “Work 2.0” (or whatever damned thing WIRED is trying to call it now), then there are worse places to start than this interview.
RECOMMENDED READING: Just Ride: A Radically Practical Guide to Riding Your Bike by Grant Peterson
Although this is framed as a manifesto by a former bike-racer-turned-designer/bike-populist, railing against what “racer mentality” has done to the otherwise universal American pastime of “riding bikes,” I’m *manically* recommending it to anyone who likes to pedal. It’s a great, great book: a quick, fun read composed of short, tightly focused practical articles. the book is *packed* with excellent advice on fitness, maintenance, bike fitting, and riding techniques. E.g., this was the first I’d heard about using your hips to assist cornering, and it’s *changed my life.* I disagree with him about helmets (since I started riding daily in a city full of drivers-from-elsewhere, I’m *deeply* committed to my relationship with my brain bucket), but his points about how to own a slightly larger slice of the road by giving the *impression* that you’re an incompetent rider has been revelatory.
I’ve never been tainted by the bike-racing headspace (I’m *waaaaaay* to lazy to be into competitive *anything*), but I read this book in a single day, and have been going back to it frequently since, applying Peterson’s tips to my bike, diet, and exercise regimen. Get a copy, read it, and keep it close at hand.
If there’s a whack-ass Yoda hat at the center of the Universe, then this is the point farthest from
A pal posted pics on Facebook of her two boys dressed as Luke Skywalker and Yoda. They looked *rad* as HELL, and I just basically freaked out, I loved the knitted Yoda hat so much. She obliged with the pattern she riffed on to make it, and I furnish that to you, here, now. Enjoy, my little yarn-crafters!

Ravelry: You Seek Yoda Hat pattern by Nancy Lutz
(thx, steph!)
Recommended Kit: Back to the Roots Oyster Mushroom Kit
My family gave me one of these Back to the Roots oyster mushroom kits for Father’s Day this year. I was not initially impressed: I babied the damn thing for a month, and got *nothing*; not a single damned filament of mycoprotein. Pissed off, I ditched it onto on my office desk down in the basement with the conviction to write a *very scathing* letter to the manufacturers. Then I got distracted for a month, and neglected both the kit and the letter writing. When I came home from the first day Maker Faire Detroit I discovered this:

Which, in just 24-hours, developed to this:

Which was *delicious* (as promised). So, I kept neglecting the kit. It’s three months later, and the kit just put out its *fourth* batch of mushrooms (i.e., twice as many as it’s supposed to). Yes, each batch is diminished in size from that first, but seeing as how I was only promised two, this strikes me as solid performance. I rate this a *Buy.*
UPDATE: About a week after this post went up I get an email out of the blue from one of the mushroom farmers at Back to the Roots, thanking me for my sticktoitiveness. Stand up folks all around, and clearly pretty responsive to customer concerns. I score this as another point in their favor.
On Building a Sukkah with a Six-year-old
It’s Sukkoth this week and, at the urging of my six-year-old son, I’ve finally fulfilled the mitzvah of building a sukkah.
Statistically speaking, 98 percent of you have no clue what I’m talking about. Briefly: Sukkoth is a Jewish harvest holiday. It generally happens in October-ish[*] and lasts about a week. To celebrate Sukkoth you build a sukkah (basically a little shanty) outside your house. This is because the ancient Hebrews lived in towns, with their fields held communally elsewhere. During harvest they’d build little shanty encampments out in the fields, rather than schlepping back and forth every evening. Building a sukkah is a reminder that this is how folks lived before CSAs and office jobs; eating dinner and chilling out in the sukkah is de rigueur (and likewise a “mitzvah,” a word many folks erroneously translate as “good deed.” Mitzvot are, literally, “commandments.” Just let that sink in. The Lord said unto us “Listen, I need you to build some shanties, and to drink beer and stuff in them. Amen.”)

The qualifications for a sukkah are pretty loose: It needs to be big enough for at least one person to sit in it comfortably (technically the minimum size is seven “handbreadths” deep by seven wide by 10 tall, or roughly 2.5″x2.5″x3″ [!!!]), it needs to be open on one side, it needs to have walls that can “withstand the wind,” and it needs to have a roof that is 1) made of natural materials and 2) blocks half the sunlight in daytime, yet still makes it possible to see the stars at night.
Inspired by several picture books, his religious school, and a local sukkah contest, my son got very hyped on building a sukkah. So, we headed down to the lumber yard, got a dozen six-footers (actually, for supply and cost reasons, we got six 12-footers and had the yard cut them in half, but you get the picture), and then went home and built this slightly modified cube (you’ll note that we transposed one 2×4 from the threshold, instead using it to stabilize the roof). The walls are scrap lumber that was left in our garage by the previous owners (when we moved in a decade ago) and leftover canvas from the PVC Teepee project in Snip, Burn, Solder, Shred. The roof is a base of jute twin piled high with wildflowers harvested from the yard of the abandoned house next door.

All told, it took us a couple hours spread over two days to erect this, and a very limited assortment of hand tools (a saw, power drill, hammer, a rag-tag fistful of mismatched nails, some decking screws, and a stapler). Cost: about $20.
This is certainly a project that requires a little care–you can rip up a finger with a power drill, and even a janky little stick-frame shanty can give you a good clunk if it keels over–but it’s one that basically any first-grader can assist on. Two lessons naturally arise in the process:
Finally, my wife–who is not Jewish–*loves* the way the roof changes as the sky changes, and insisted I include at least one picture of this. So, here’s a shot from this morning. The Michigan sky is a featureless grey mat, and the roof itself had taken a beating in an early-morning rainstorm:

White House Ale and a Short Lil Diatribe on Keeping It Simple
I know I’m about a week late on the White House Beer Recipe story, but I wanted to chime in just in case anyone missed it:
Ale to the Chief: White House Beer Recipe | The White House
(I’m including the recipe for the Honey Ale below because it looks better to me, but this PDF of the beer recipes includes both.)

I brew a bit, and am constantly annoyed by how meaninglessly technical homebrewing is. This is a prime example of hobbyists getting so wrapped up in gear and minutia that they out-professional professionals and out-tradition the traditions themselves. This is especially true with beer, which is why I stick to wine–incidentally, brewing it in plastic buckets and glass jugs using plain-old bread yeast. With my hardware-store gear I have roughly the same success rate as any other novice homebrewer–which means some recipes and batches are shockingly good, others skunk vinegar. But, seeing as how my way costs about 15 cents per bottle, I’m fine with a few batches that go straight into the compost.
These recipes are pretty straightforward, but still strike me as a bit dandified, so I offer you this, the bare-bonesiest beer recipe I’ve yet found. I haven’t tested it yet, but it’s on my list for this fall. I’ll report back when I do–and if you happen to give this recipe or the White House Ale a try, howsabout you tell me how that goes?
What would you MaKey MaKey?
A brand new MaKey MaKey was among the pile of mail awaiting me when I got home from my trip this weekend. Project 0 is throwing together a controller for playing Super Meat Boy. What would your Project 0 be?
Dirt-Cheap Amplifier Aesthetics and Tweaks: Grills & Fabric, New & Used, Weird-Spec Speakers

One of my goals with the projects in Snip, Burn, Solder, Shred was to present designs that–both in terms of the functional guts and the finish aesthetics–could be adapted to suit both your own tastes and the supplies you could easily get. For example, the grill on the Dirt-Cheap Amp is an old computer power supply fan cover–which just happened to be the perfect size to secure my 8 ohm speaker (itself torn out of a broken Barbie boom box). I’ve also had good luck pulling grills off of old/broken small appliances I’ve gotten for free as resale shop rejects or garage sale leftovers. As far as new sources, check out your local hardware store, where there are many neat vent, drain, and recessed-lighting covers (the plumbing, electrical, and HVAC aisles are always profitable places to search for neat fittings, in my experience).
Upholstering Your Amp
Failing all else, you can cover the front of the amp in fabric (as is standard in the old school Fender guitar amps). When doing a fabric cover, I like to start with a double-layer of nylon window-screen mesh, which protects the paper cone of the speaker from getting dinged. Double up the mesh, then cut a square at least a few inches bigger than your speaker hole and staple it in place around the perimeter of the screen (you can, of course, cover the entire front of your speaker cabinet in screen, which will make your amp look a bit more pro. I sort of like the look of the doubled mesh, but if it doesn’t work for you aesthetically, you can recover it with basically any single layer of fabric (going the Fender Tweed Amp road, for example). In terms of finish, you can pull the fabric all the way around the lid and staple it from behind (thin fabric won’t usually cause you much grief in terms of getting the cigar box to close once you finish). A few brass-headed furniture tacks added to the edging of the front of the fabric cover, or framing it out in thin strips of wood or brass, will give the amp really slick look.
Using Weird Speakers
Folks occasionally ask me if this design–which calls for an 8 ohm speaker–will work with lower impedance speakers. I’ve tested this out, and had the amp work perfectly with 3 and 4 ohm speakers I’ve scrounged out of old boom boxes. I’ve also had decent results with speakers as high as 16 ohms. So, if you’re salvaging parts, feel free to grab those 3, 4, and 6 ohm speakers as well as the 8s. If you find your non-standard speaker distorting, you might wanna monkey around with the pin 1 to pin 8 jumper: some amps built around “non-8” speakers work better with pin 1 and pin 8 connect with plain old wire (as in the base design shown in the book), others work better with that connection omitted altogether, and some need the gain-boost that comes with connecting pins 1 and 8 using an electrolytic capacitor (as described in the “Tweaking the Amp” section of that project).
DIY Music Freebies
UPDATE: You can now get a free “Jam Pack” of musical projects from my first two books!